Showing posts with label How-To. Show all posts

Wednesday, March 6, 2013

Recipe: Chocolate Cake Batter Chocolate Chip Cookies


This recipe consisted of trying to jam as much as I could into one cookie, while still tasting like some awesome creation from Cold Stone. I think it turned out pretty well, and next time I will try regular cake batter for sure! Try these out when the kiddies are coming to your house, or when you are heading out to a game night with a bunch of hungry friends, you won't be sorry.


Ingredients:

1 1/4 cup flour
1 1/4 cup boxed cake mix (devils food, yellow, white, whatever you fancy)
1/2 tsp. baking soda
1 and 1/2 stick of softened butter
1/2 cup sugar
1/2 cup brown sugar
1 egg
1 1/2 tsp vanilla
1 1/4 cup chocolate chip mix ( white and milk is what I like)
1/2 cup sprinkles


To Make:

1. Mix together flour, cake mix and baking soda in a small bowl and set to the side. 
2. In a mixer, cream the sugars and butter on medium for about 2 minutes until fluffy. Mix in the egg and vanilla until creamy.
3. Gradually mix in the flour mixture until combined, and then fold in the chocolate chips and sprinkles.
4. Preheat your oven to 350 degrees, and let your dough get a little stiff in the freezer for about 20 minutes.
5. Scoop the dough by tablespoons and roll into balls. Bake for 10-12 minutes until the edges are set and lightly browned. Allow cookies to cool on the tray for about 5 minutes before moving to a cooling rack.


You will not be disappointed.


-Sara Jacqueline

Monday, March 4, 2013


Recipe: Coconut Chocolate Chip Bars


These babies are very delicious, and taste pretty close to a Samoas girl scout cookie. Last weekend, I was low on eggs, and needed to bake or else I would die, and thought of these yummy little bars that don't make too many. Sometimes, I bake with the intentions of eating the entire pan, so I at least had to make a small batch of sweets in order to survive. I think next time I will concoct some caramel topping as well...hmmmm.


Ingredients:
1 cup flour


1/2 cup butter butter, melted 
1 cup brown sugar

1 egg

1½ teaspoons vanilla extract

1 cup sweetened flaked coconut

1 cup chocolate chips 
Topping:
1 cup  chocolate chips

To Make:
1. Preheat oven to 350°F. Grease  an 8-inch square baking pan.
2. Stir the melted butter and brown sugar together until smooth then beat in egg and vanilla until well blended.
3. Slowly beat in the flour until blended, then stir in the coconut and chocolate chips.
4. Scrape the batter into the pan and smooth evenly.
5. Bake for 25-30 minutes, or until set in the center but still soft.
6. Melt the chocolate chips in a microwave or with a double boiler and drizzle across the top of the bars. I spread mine (after taking that picture) evenly across to create a nice chocolate top. Wait until cool, or throw them in the freezer for faster results!

Eat up!

-Sara Jacqueline

Wednesday, February 27, 2013

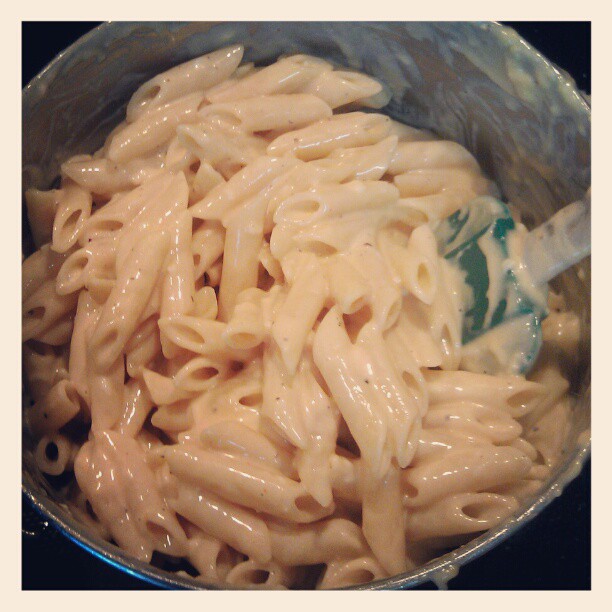
Recipe: Stove-Top Mac & Cheese


I think it is about time I share one of my best go to recipes. When I am just trying to feed people in a fast, easy and delicious way I get out this recipe (which I think I have memorized now) and whip up some homemade kid food. 

The great thing about this recipe is that you literally cannot mess it up or make it taste bad. Anything goes. You can use pretty much any kind of cheese you have one hand. I have tried all of the shredded varieties in the supermarket cooler and mixed up the cheese leftovers in my house as well. If you are into being a more health conscious eater, you can definitely substitute all of the ingredients for whole wheat, egg whites, skim milk, 2% cheese, etc. It still has a mac and cheese vibe even if you cut the calories. The only thing I haven't tried yet, is making it egg free...which I should get on that for my pal Lauren and her allergy house...so tell me if you try it! 

Make some mac and cheese tonight, you won't be sorry and you probably have everything in your pantry right now.


Sara's Stove Top Mac and Cheese

Ingredients:
1 lb of pasta noodles (any sort you wish)
4 T Butter or margarine
2 Eggs
6 oz Evaporated milk (1/2 can)
Dash of hot sauce
3/4 tsp Dry mustard
10 oz Shredded Cheddar Cheese (give or take, this does not need to be perfect!)
Salt to taste
Black pepper to taste


To Make:

1.Cook pasta according to box directions until al dente and drain.

2. Return to the pot and melt in butter. Whisk the eggs, milk, hot sauce, salt, pepper and dry mustard together and stir into the pasta over low heat. 

3. Add the cheese in and stir continuously until melted and creamy. Serve immediately! Way better than that blue box stuff.


I hope this rain goes away soon! Who is ready for Spring??


-Sara Jacqueline

Thursday, February 14, 2013

Happy Valentine's Day!


In celebration of this love-ly holiday, I made some delicious Red Velvet Cheesecake Cookies. They were amazingly simple and really different, so I would definitely suggest you whip up a dozen giant cookies. Here is a recipe adapted from Twos Peas & Their Pod! Enjoy your Valentine, your hot date, your little box of candy, whatever it is, soak it up!


Red Velvet Cheesecake Cookies
Makes: About  10 giant cookies
Baking Time: 11-13 minutes


Ingredients:
1 box red velvet cake mix (I used Duncan Hines)
2 tablespoons all-purpose flour
2 large eggs
1/2 cup canola oil
1 teaspoon vanilla extract
For the cheesecake filling:
4 oz cream cheese, at room temperature
2 cups powdered sugar
1 teaspoon vanilla extract
For the white chocolate drizzle:
1 1/2 cups white chocolate chips, melted

In a large bowl combine cake mix and flour and mix until clumps disappear. Mix together cake mix, flour, eggs, oil and vanilla extract with a mixer until smooth. Wrap the dough in plastic wrap and place in the refrigerator for at least 2 or 3 hours. The dough will be shiny, so don't worry.
To make the cheesecake filling, while you are waiting  combine cream cheese, powdered sugar, and vanilla extract and mix until smooth with a mixer. Scoop out cheesecake filling and place on a plate in heaps. Continue scooping out cheesecake filling into teaspoon balls until you have 10 or 12. Place plate in the freezer and freeze for at least 2 or 3 hours.
Go take a nap, fold some laundry, run 6 miles, clean the kitchen...whatever makes you happy.
When you are ready,  preheat the oven to 350 degrees F. Line a large baking sheet with parchment paper or a silpat.
This is the tricky part....To assemble the cookies, take about 1/4 cup, or a heaping spoonful of the cookie dough and flatten in your hands. Place a teaspoon of cheesecake filling in the center and wrap the cookie dough around the filling. Gently roll into a ball , or attempt to seal the filling inside and place on prepared baking sheet. You want to work quickly so that your dough and filling doesn't heat up in your hands, it will make it more difficult. I greased my hands with some pam spray before this step.Only bake 3 cookies at a time on each sheet because they will become huge. Bake for 11-13 minutes or until the cookies begin to crackle and look solid around the edges. Let the cookies cool on the baking sheet for 5 minutes, ten place on a cooling rack to cool.
If you would like, you can stop here because the cookies are JUST as yummy, but if you want to step it up a notch, make them guest worthy, and a little sweeter, keep going with the drizzle!
Melt the white chocolate chips in a microwave safe bowl or over a double-boiler. Drizzle the white chocolate over the cooled cookies. Let the cookies set until the chocolate hardens. 

Ta-da!! A Valentine treat to drown out your sobs while watching The Notebook. 

A quick shout out to my husband. We have never been in the same city, or even country on Valentine's Day in over 5 years of dating, and including today when we are actually married..haha. I am so happy ecstatic to be married to a wonderful man like him. He really completes me and I love having him as my best friend, knowing he is always there by my side. I love him, so if he happens to read this (fat chance) I want him to know how much I care for him, every day not just Valentine's Day. :)


Eat some chocolates people! Loves ya


-Sara Jacqueline

Monday, February 11, 2013

Recipe: Red Velvet Valentine Brownies


I have always had this weird love for red velvet cake, mostly only because it is so colorful and bright, but I do love some good chocolate cake too. I have been scoping around for some good Valentine's Ideas, and obviously red velvet it a perfect choice. My inspiration came from Steak and Shake's Red Velvet Cake Milkshake (SOO awesome and tastes just like it) and also the box of red velvet pancake mix I spotted in the aisle at Walmart. So I decided to do it my own way, with a brownie creation topped with a cream cheese frosting, because I know my Valentine would appreciate that.

This would be one of those recipes that I would definitely whip out over and over again, because it is very easy, as well as VERY tasty. It could also be doubled, but for the sake of our health, I decided to just make an 8x8 dish of brownies to share. It seems that all of my friends are on diets lately, so I can't think of anyone to give these things to. Darn. :)

Grab yourself some red food coloring, an apron (seriously, that food coloring goes everywhere) and get started! You won't be sorry...


Ingredients:

3 T unsweetened cocoa powder
1 oz red food coloring
2 t vanilla extract
1 stick of butter (1/2 cup) at room temperature
1 1/2 cups of sugar
2 large eggs at room temperature
1 1/4 cup all-purpose flour


Preheat the oven to 350 degrees fahrenheit and  Butter and flour an 8x8 baking pan.

Slowly stir together the cocoa powder, red food coloring, and 1 tsp vanilla into a small bowl. Stir until it becomes a thick paste with no lumps of cocoa powder and set to the side.

Beat together the butter and sugar on medium speed until light and fluffy with a mixer for about 2 minutes. Add the eggs and mix well. Stir in the other 1 tsp of vanilla well and then the cocoa mixture. Make sure the mixer is turned off when you place the cocoa mixture in because you do not want that red dye flying all over your kitchen or your shirt. Mix together until the batter is one color, and then add in the flour on medium speed until just combined. 

With a rubber spatula stir the  batter around to make sure it is not sticking to the sides and the coloring and flour are fully incorporated. Pour the batter into the pan and bake for 35 minutes give or take. 

If you put a toothpick in the center of the brownies to check them, and it should come out clean.
While you are letting the brownies cool in the pan, you can make the frosting!


Ingredients: 
6oz Reduced Fat Cream Cheese
1/2 stick butter (4T) at room temperature
3 cups powdered sugar
1 t vanilla extract


Mix the cream cheese and butter on medium speed until well combined and fluffy. Place the powdered sugar in gradually, stirring to combine after each small part, then adding more until you have reached all 3 cups. Add in vanilla, and beat until light and fluffy on medium speed.

You are going to want to lick the beaters.

Use the frosting to frost the brownies in the pan after they have cooled about 20-30 minutes and then serve, or let the brownies cool for over an hour, remove from the pan, and then frost them.

YUM. You will not be sorry for making these bad boys. They are a perfect Valentine's Day treat for anybody.


Tell me what you think about my recipe if you try it!


-Sara Jacqueline

Wednesday, April 25, 2012

How To: Making Flour Tortillas


For our culture class this week, our cute little teacher Irma, took us to see how flour tortillas were made, since those are our favorite kind--they are much better than corn. We just waltzed up into this tortilleria (tortilla factory) and they thought we were pretty entertaining just to look and laugh at. We watched these four tortilla makers work hard to prepare their dough for the day. 


Each one of these dough blobs is weighed and will make about a half tray of rolled tortilla dough balls...a.k.a....a LOT of tortillas.


The dough blobs are placed in this pan, and then stuck into that 'cutting machine' where the dough is flattened into the pan and cut into even little proportions of dough ready to roll into balls.


Here are the trays of the dough balls that they both roll by hand after the prepared dough blob is cut into even proportions. Remember, one dough blob can make half a tray of tortillas balls, and there were a lot of dough blobs. Also, if you notice behind her, there are racks and racks of trays full of dough balls ready to make into flat cooked tortillas.


Rolling the dough balls is a skill, you must roll them the right way, or else air bubbles can get inside or the dough will stick to your hands and slow you down. The best way to roll them is to form your hand like a claw, and roll them on the table very fast.


We left the tortilleria, and headed back to Irma's house to make some flour tortillas of our own. Here we are all ready to go!


Our ingredients consisted of 1Kilo of flour (about 1/2 of a pound), 1 teaspoon of baking powder, 1 cup of canola oil, 1 tablespoon of salt, and 2 cups of warm water.


First step is to sift the flour and baking soda together.


Next step is to pour the oil in and mix well with the flour and baking powder.


Add the salt and then say cheese.


Mix some more, and add the water until the dough comes to a good dough like consistency, not too sticky, but not too dry either. You may not need all of the water, and be careful not to burn your hands with the hot water.


Once the mixing is complete, put the dough in a warm area for 30 minutes to settle and rise and do all that stuff that tortilla dough is supposed to do.


Get out your dough and roll into tablespoon sized balls.


Don't forge the proper way to roll the dough!


If you have a tortilla press, go ahead and use it..if not, just squish the dough flat like you would a pizza crust, then peel off the table or plastic wrap and take it to the hot griddle.


Once your tortillas are on the griddle, they act a bit like pancakes, when they seem solid on top or crispy around the edges, go ahead and flip them, and then repeat until they feel and look like tortillas.


I look happy in this picture, but really the tortilla is burning my little hands, Ouch!!!!


Once the flour tortillas were cool enough to hold, we just topped them with jelly instead of going all out and making tacos. Tortillas con mermelada is actually a sweet treat that little kids here enjoy as a snack. Yummmy!! I cannot wait to make flour tortillas at home, and maybe even some whole wheat flour tortillas! 

Only 5 Mexican Days left!


-Sara Jacqueline